Setup
Two installers and one pasted line — no terminal required
You do not need a terminal for any of this. If you do not know what a terminal is, good — you will not be asked to open one.
- Install R — download, double-click, Next, Next, Finish. Where →
- Install RStudio — same. Where →
- Open RStudio and paste one line into the Console — the pane at the bottom left, the one with the
>prompt — then press Enter:
source("https://sbd-26-27.netlify.app/materials/setup.R")That line checks your machine, installs every course package you are missing, creates a project folder for the course, and ends with a plain-words report of what it did. It takes a few minutes the first time. Running it again later is harmless.
The check comes first because most setup failures are not about R at all. If your laptop will not let you write to the system library, which is normal on a managed machine, it makes you a personal one and carries on. If the network blocks R’s downloads it says so within seconds, instead of stalling for twenty minutes. If your home folder sits inside OneDrive it puts the course folder somewhere local, because file sync and R do not get along.
If the report ends with ✓ on every line, you are done and the rest of this page is reference. If a line starts with !, it tells you what to do next.
This is for your own machine, not for the exam. Exams are sat on the computer-lab machines, which already have R and every course package installed — see Assessment. Set your laptop up so you can practise on it; you are never asked to bring it to an exam.
Posit Cloud is RStudio running in a browser tab — nothing to install, free for what this course needs. Sign up, New Project, and paste the same source(...) line into its Console. Your laptop’s problem stops being your problem. Come to office hours and we fix the laptop with no deadline hanging over it.
Install R
R is the engine; RStudio, next section, is the car around it. You install them separately, and you need both.
The course targets R 4.6.x or newer. Check what you have:
R.version.stringGo to cran.r-project.org and follow Download R for your system. It is an ordinary installer: download, open, keep the defaults.
The one step that genuinely trips people up is on a Mac, where CRAN offers two builds. Apple silicon (arm64) is any Mac from the M1 onwards — that is every MacBook sold since late 2020. Intel (x86_64) is older. If you are not sure: Apple menu → About This Mac; if the chip line says Apple M-something, take arm64. Install the wrong one and packages fail with errors that look like something else entirely.
On Windows: click base, then the big download link at the top. The installer asks for administrator rights — on a locked-down work laptop, sort that out before the lab, not during it.
On Linux: follow CRAN’s page for your distribution rather than your distribution’s own r-base package, which is usually several versions behind.
rig, the R Installation Manager, installs R with one command and picks the right build for your machine — no arm64/Intel question. Entirely optional; the installer above does the same job.
macOS
brew tap r-lib/rig
brew trust r-lib/rig
brew install --cask rig
Windows
winget install posit.rigLinux (Ubuntu/Debian)
sudo curl -L https://rig.r-pkg.org/deb/rig.gpg -o /etc/apt/trusted.gpg.d/rig.gpg
sudo sh -c 'echo "deb http://rig.r-pkg.org/deb rig main" > /etc/apt/sources.list.d/rig.list'
sudo apt update
sudo apt install r-rig
Then, on any OS:
rig add release      # install the current R release
rig default release  # make it the one that starts by default
rig list             # see what you have
When R 4.7 lands mid-semester, rig add release again. Old versions stay installed side by side, so nothing you wrote in October stops working in December.
Most packages arrive precompiled. A few build from source, and then you need a compiler:
- macOS:
xcode-select --install - Windows: Rtools, matched to your R version
- Linux:
sudo apt install build-essential gfortran
Do this only when an install actually fails with a compilation error — not preemptively.
Install RStudio
R by itself has no user interface worth the name. RStudio is an IDE — editor, console, plots, environment and files in one window — and it is what we use in class and what the lab machines run.
Download RStudio Desktop (free, open source) from posit.co/download/rstudio-desktop. Take the installer for your OS and keep the default settings. From then on you open RStudio, never R directly: RStudio starts R for you.
The company behind it used to be called RStudio as well; since 2023 it is Posit, because the product line now covers Python too. The IDE kept its name.
Posit also ships Positron, a newer IDE built on the VS Code core with first-class R and Python support. It is genuinely good, and Posit maintains both.
For this course, use RStudio. Every demo, every screenshot below and every lab machine is RStudio, and in an exam room you do not want to be translating menu locations. If you already live in Positron, keep it — just know that when a lecture says “the Environment pane is over there”, you are on your own.
Settings that matter
Open the preferences: RStudio > Settings (⌘ ,) on macOS, Tools > Global Options (Ctrl ,) on Windows.
Three changes, and the first one is the important one.
1. Stop restoring your last session
In General > Basic, untick everything starting with Restore:
- Restore most recently opened project at startup
- Restore previously open source documents at startup
- Restore
.RDatainto workspace at startup
And set Save workspace to .RData on exit to Never.
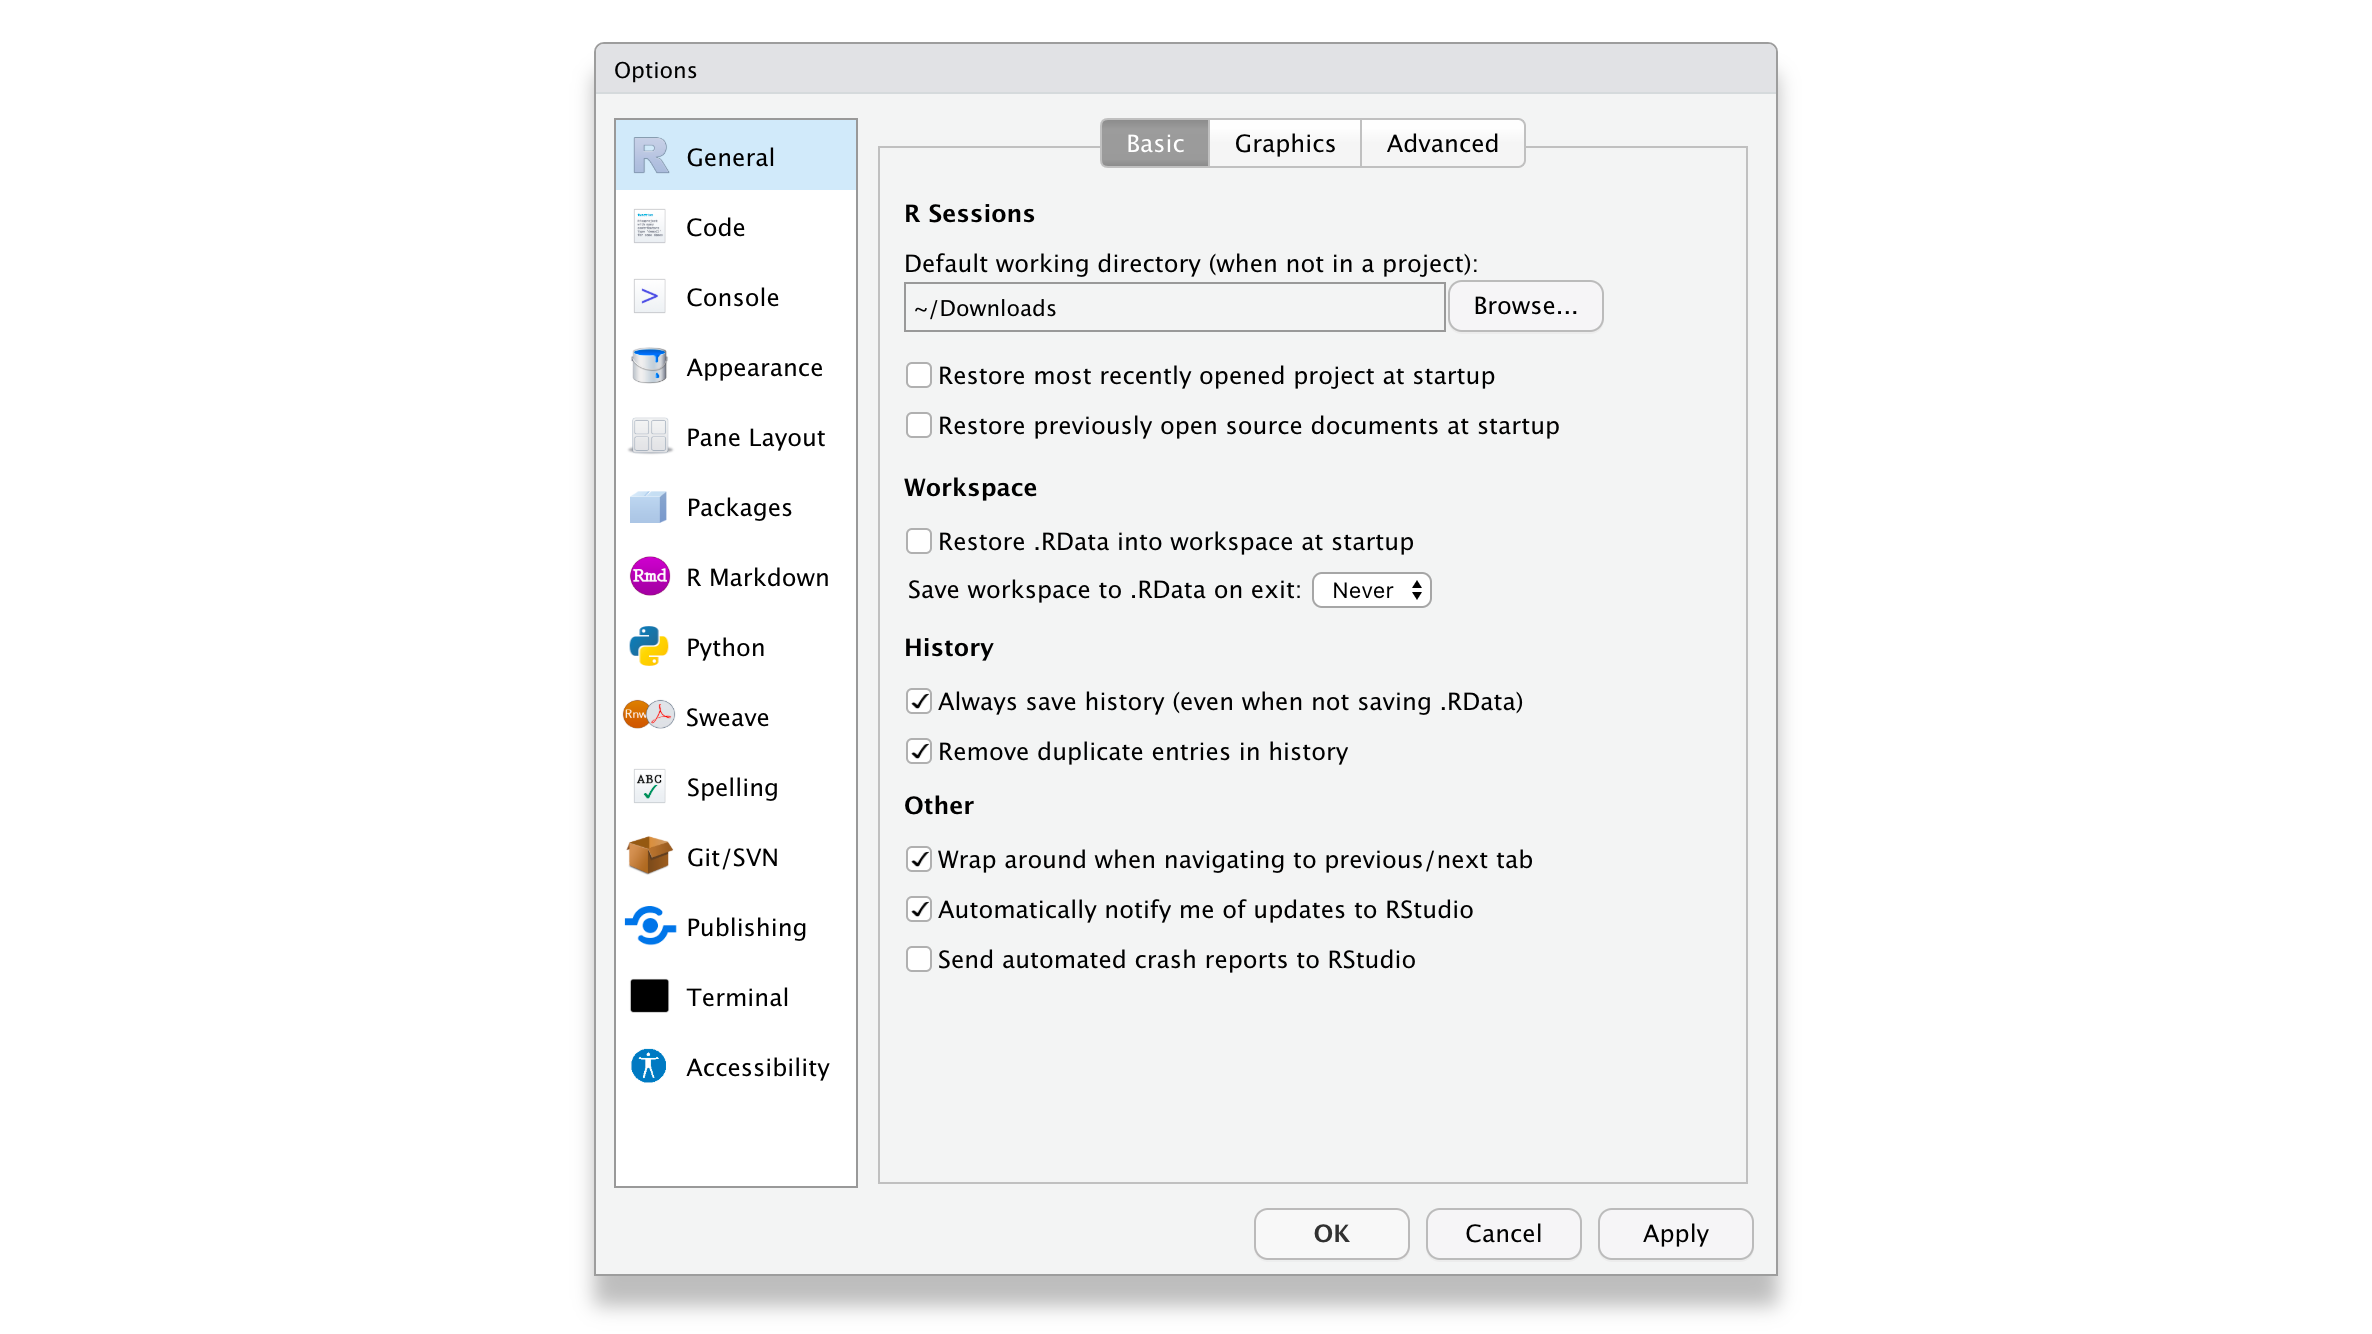
This feels backwards — why throw away your work every time? Because a restored workspace makes your code look like it works when it does not. An object you created an hour ago and then deleted from the script is still sitting in memory; your script runs, and it will not run on anyone else’s machine, including yours next week. Starting from a clean slate means the script is the only source of truth. This single setting removes most reproducibility bugs you would otherwise spend the semester chasing.
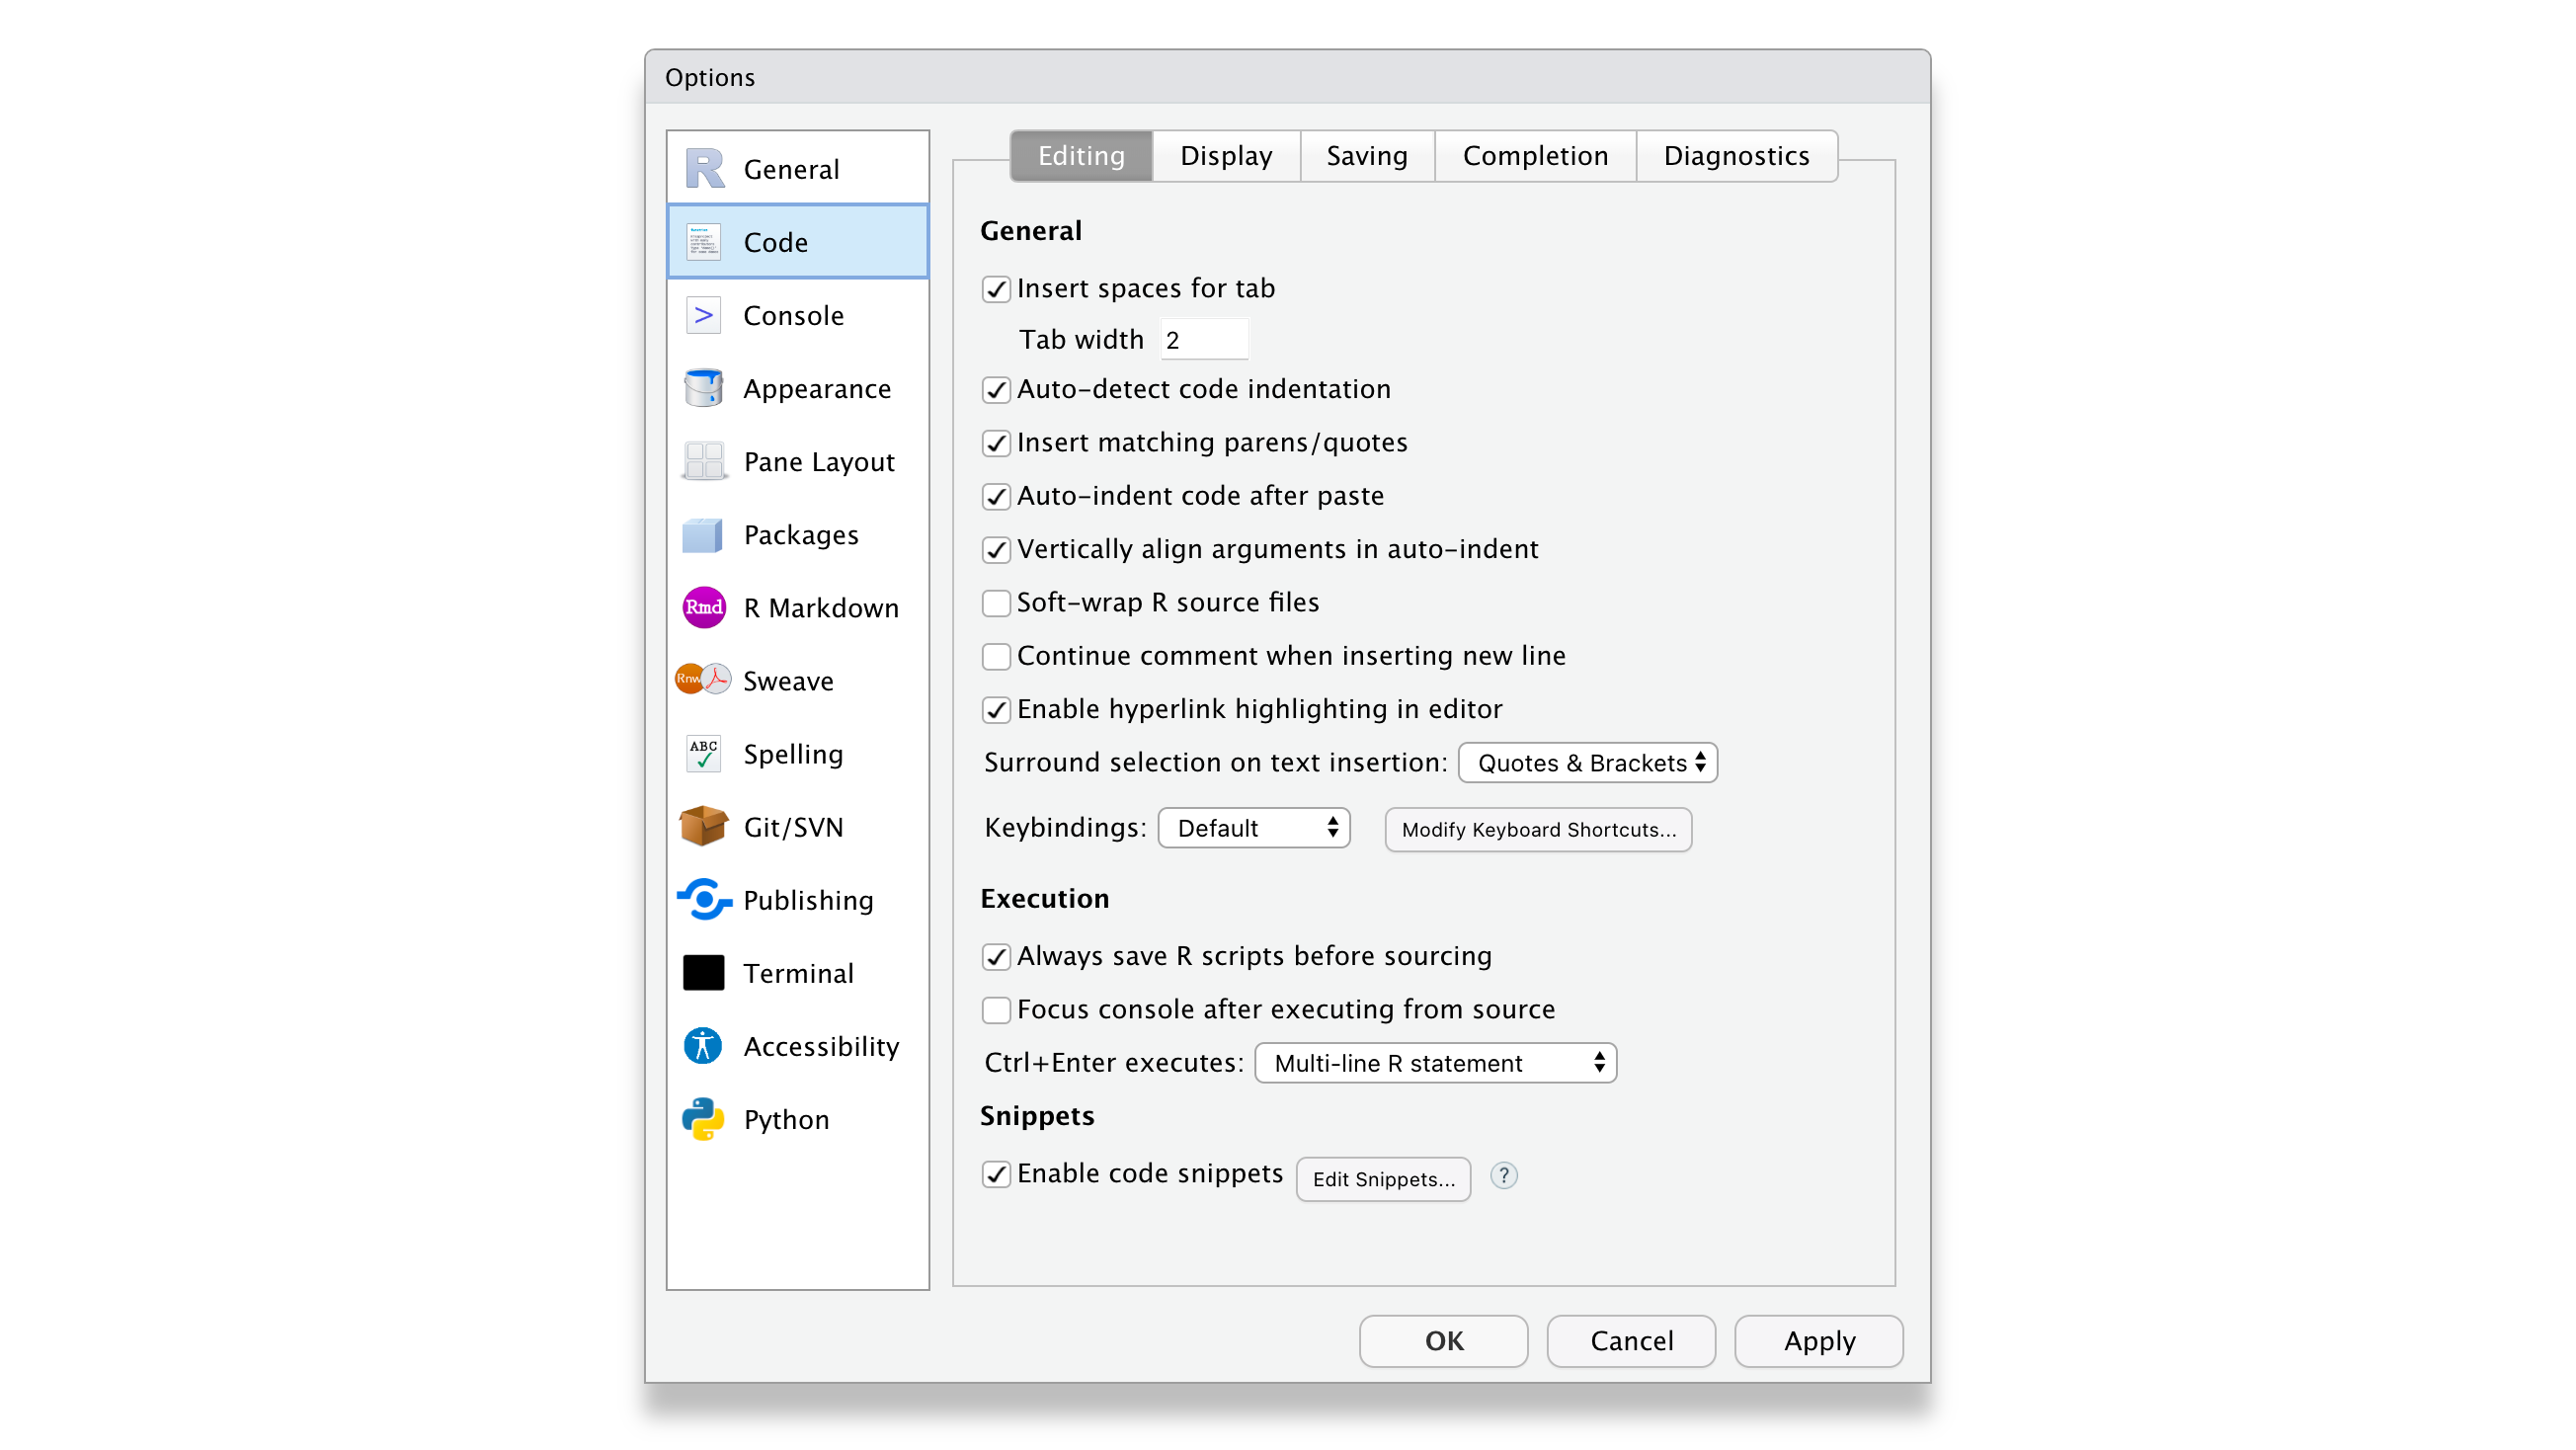
2. Editing
In Code > Editing, tick at least the first five options — especially Auto-indent code after paste. Indentation is the cheapest readability you will ever get.
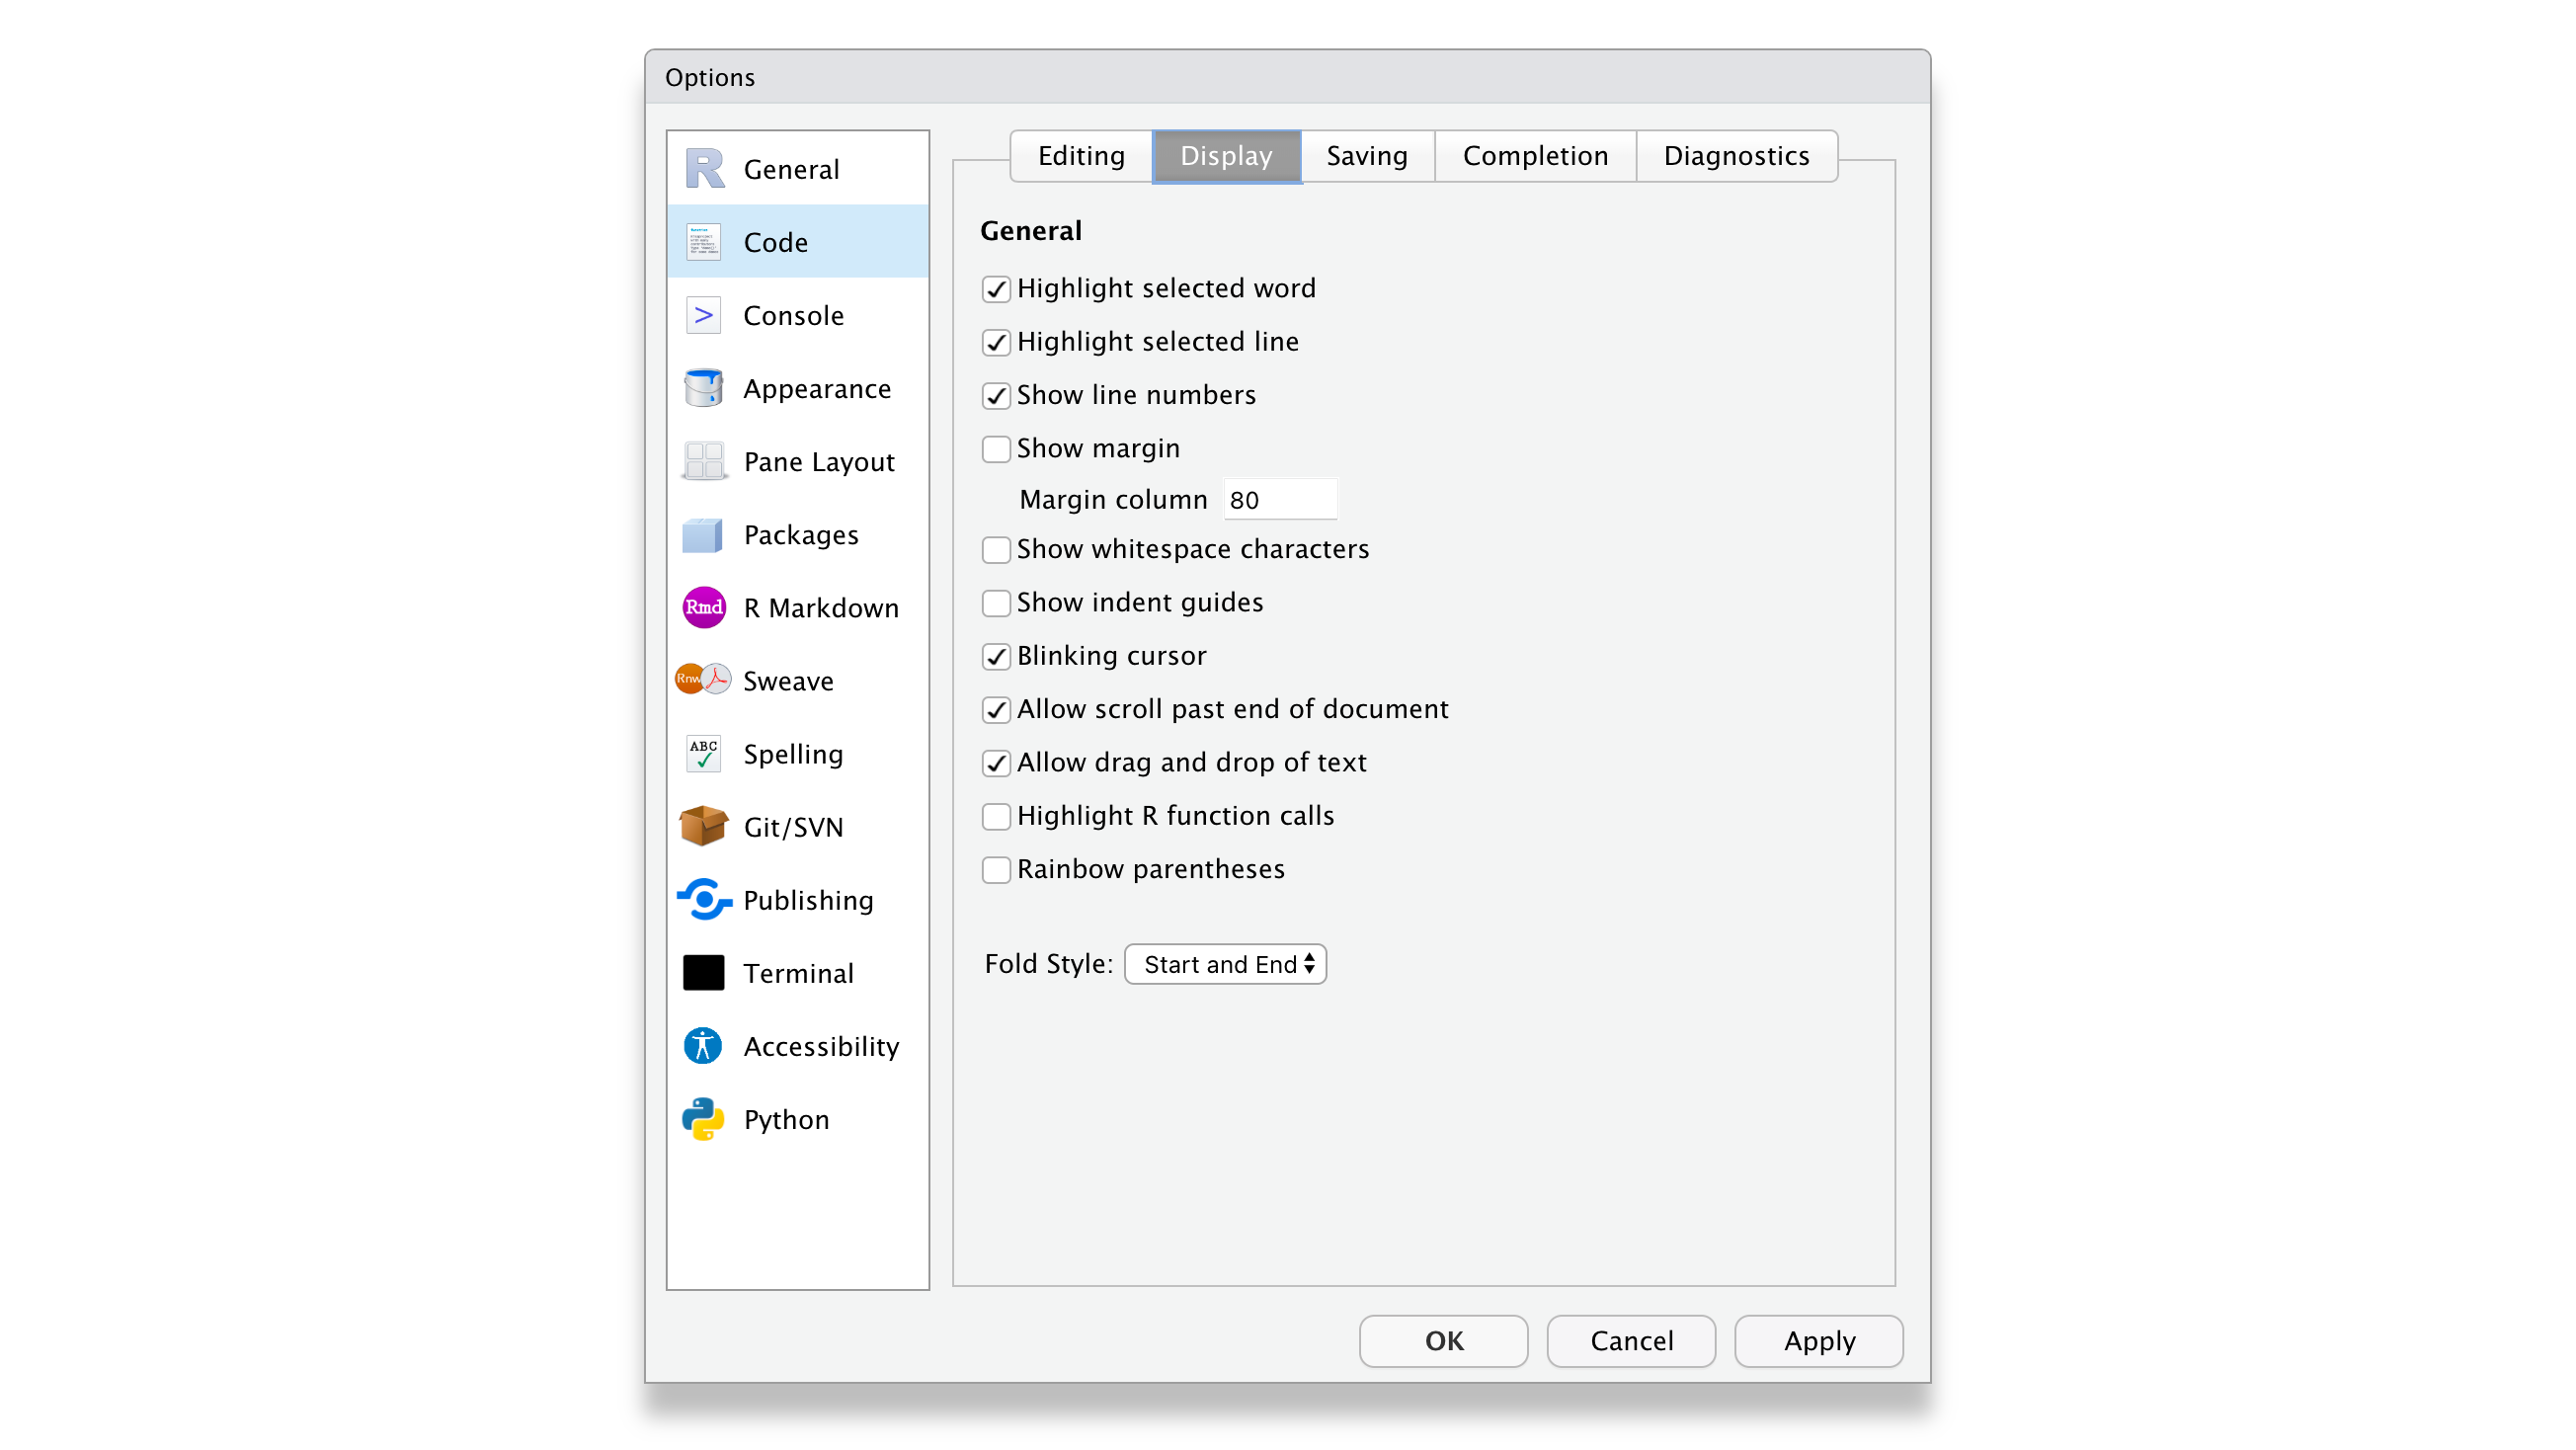
3. Display
In Display, tick the first three. Highlight selected line earns its keep as soon as your scripts get long.
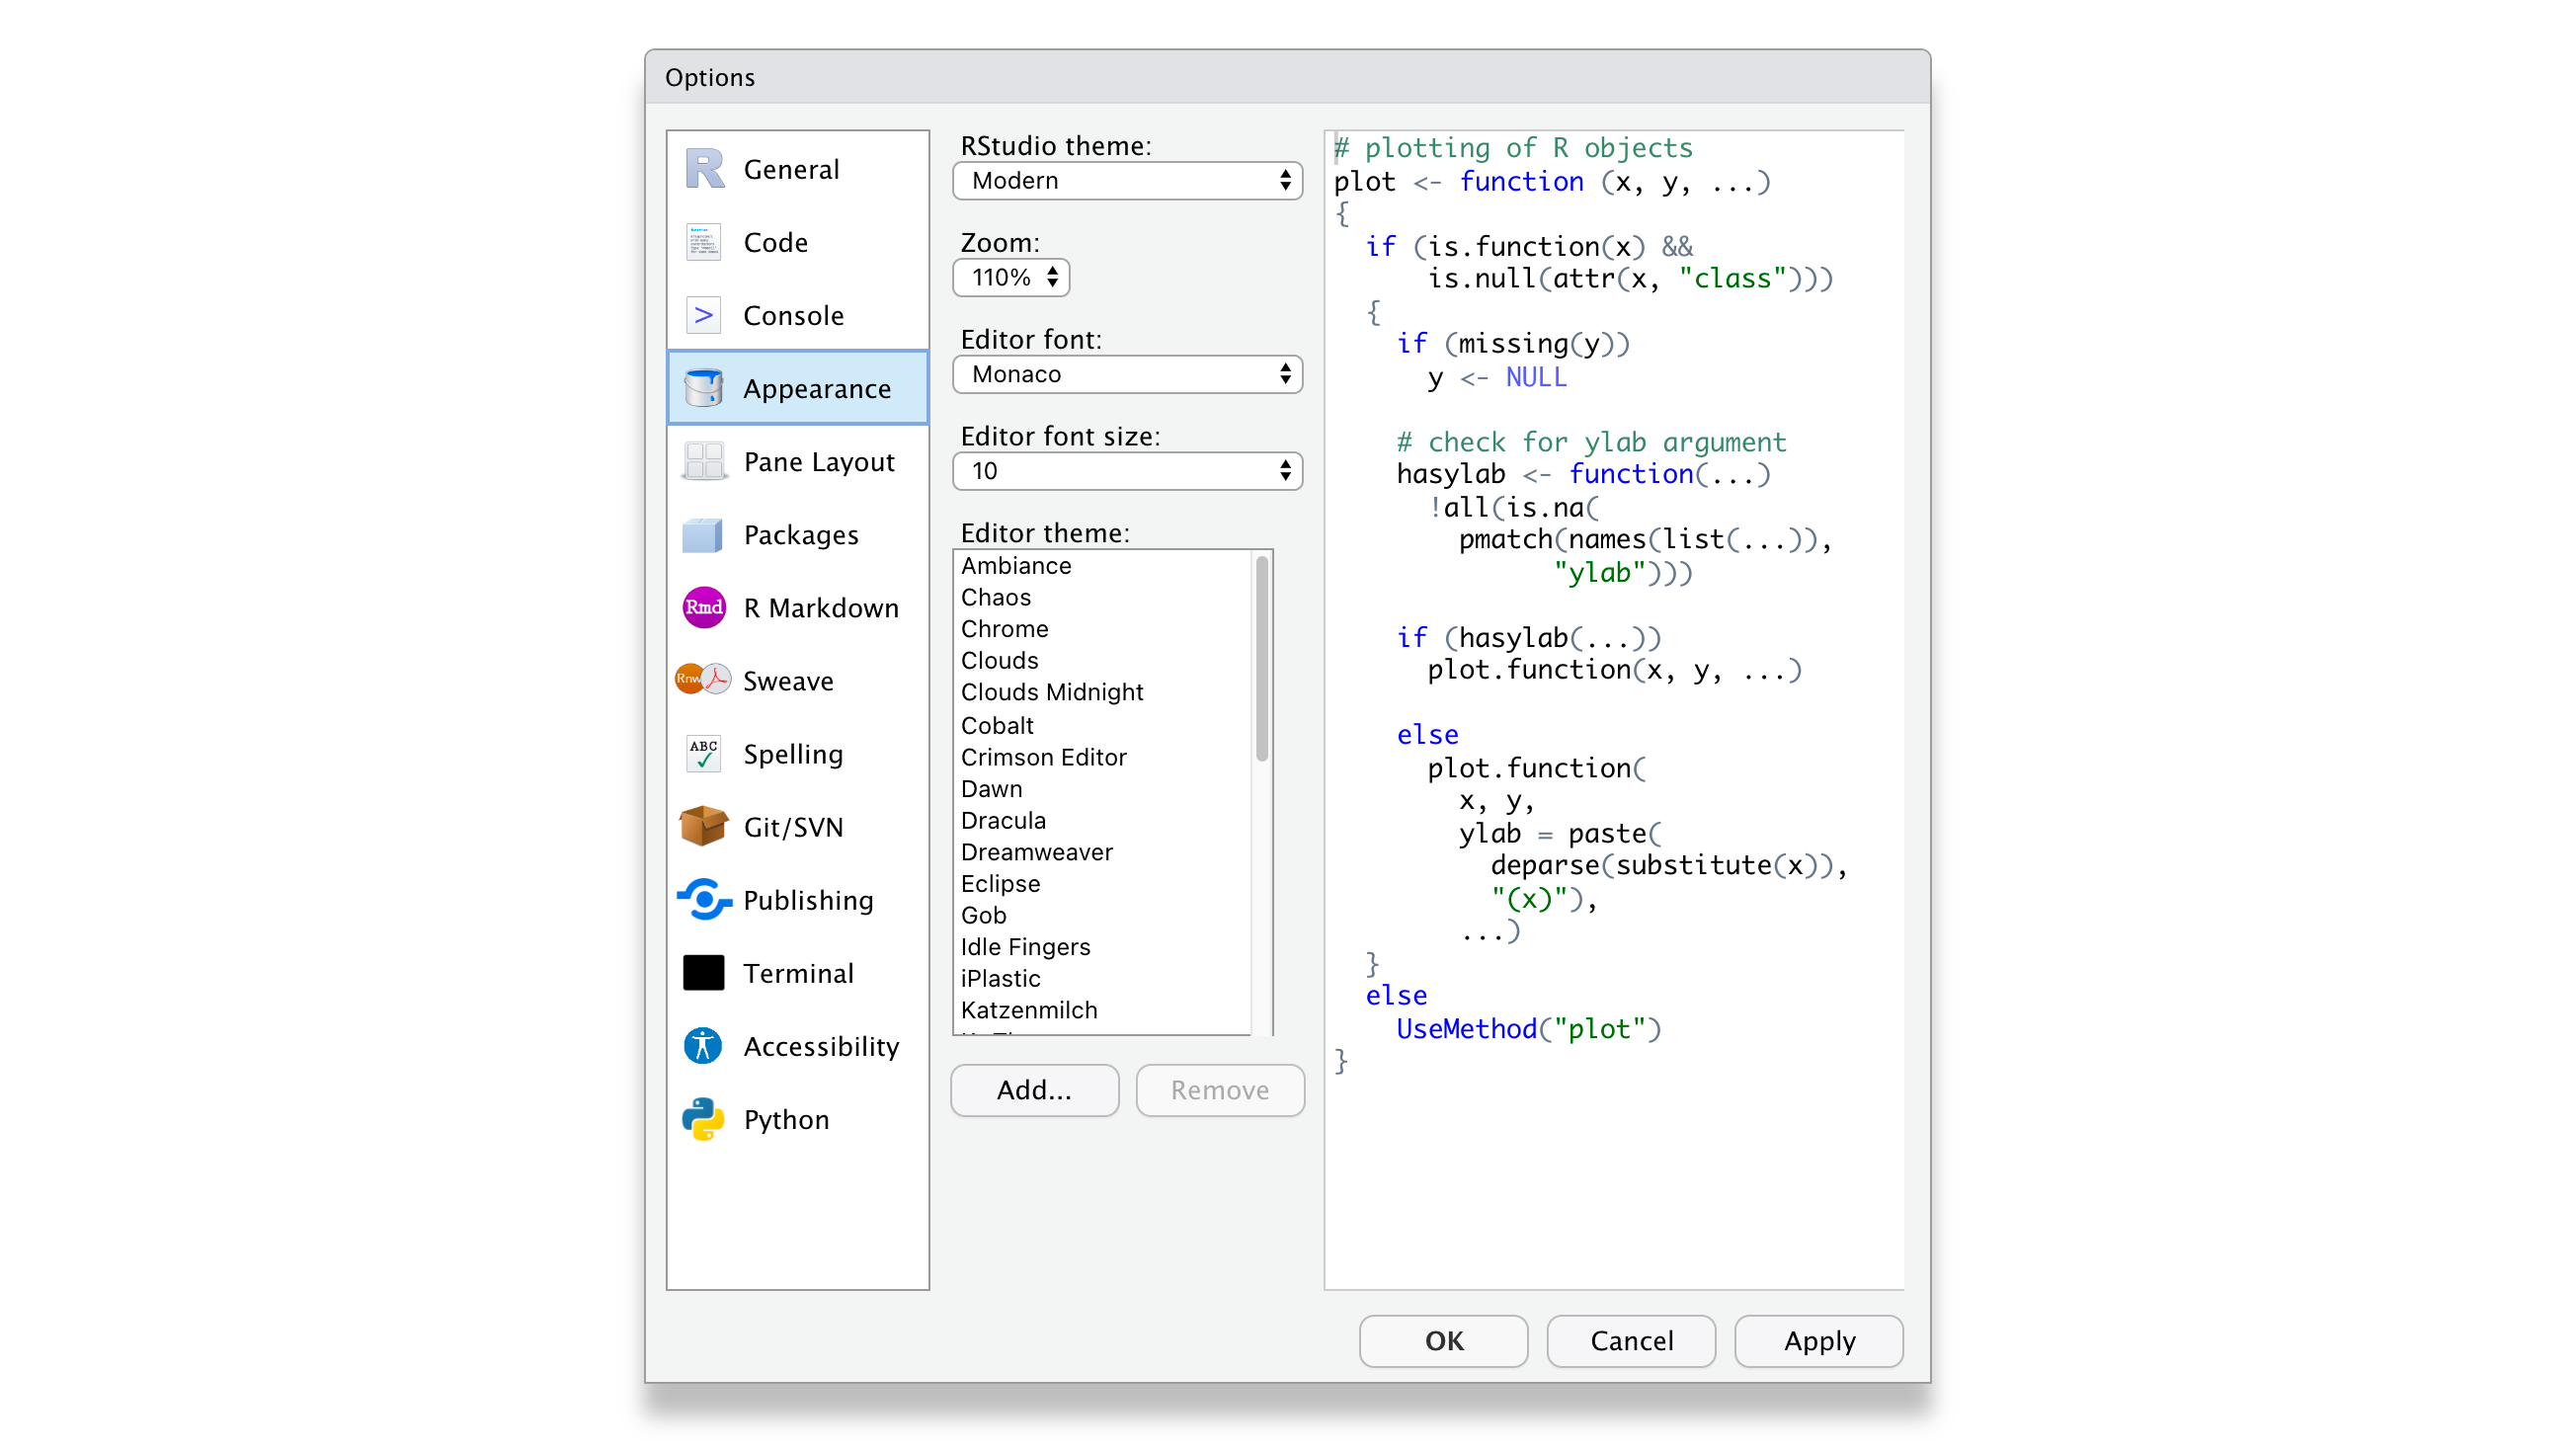
Then go to Appearance and pick a theme you like. No right answer here, and a dark theme does not make the models better.
R packages
Most of what makes R useful is not loaded when R starts — it lives in packages. A package bundles functions, help files and datasets around one job. “Base R” is just the set of functions you get for free at startup.
Two steps, and people mix them up constantly:
install.packages("dplyr")   # downloads it onto your computer — once, ever
library(dplyr)              # loads it into this session — every session
Installing puts the files on disk. Loading makes the functions callable now. Quotation marks are required for install.packages() and optional for library().
Install several at once by passing a vector:
install.packages(c("ggplot2", "dplyr", "glmnet"))Course packages
The source(...) line at the top of this page installs exactly this list, and only the ones you are missing. This is what it runs, so you can see there is nothing hidden in it:
install.packages(c(
  # data manipulation and graphics
  "tidyverse",     # dplyr, ggplot2, tidyr, readr and friends
  "here",          # sane file paths, see below
  "skimr",         # one-line data summaries

  # Module 1 — regression, regularisation, forecasting
  "glmnet",        # Ridge, LASSO, Elastic Net
  "survival",      # survival models
  "fable",         # tidy forecasting
  "feasts",        # time series features and decomposition
  "tsibble",       # time series as tidy data
  "forecast",      # ARIMA and classic forecasting

  # Module 2 — unsupervised learning and machine learning
  "factoextra",    # PCA and clustering visualisation
  "FactoMineR",    # PCA and correspondence analysis
  "cluster",       # k-means, hierarchical clustering, silhouettes
  "rpart",         # decision trees
  "rpart.plot",    # readable tree plots
  "ranger",        # random forests
  "xgboost",       # gradient boosting
  "nnet",          # neural networks
  "iml",           # interpretability: PDP, LIME, feature importance

  # datasets from the textbook
  "ISLR2"
))
Check it worked:
library(tidyverse)
library(glmnet)
sessionInfo()
If sessionInfo() prints without an error, you are set.
Updating
update.packages(ask = FALSE)R, RStudio and packages update independently of each other. Updating RStudio does not update R. This is the single most common source of “it worked yesterday”: a package built for a newer R than the one you are running. Start a fresh session after updating anything.
Not everything is on CRAN. Development versions usually live on GitHub:
install.packages("remotes")
remotes::install_github("user/repo")
Newer features, fewer guarantees. Fine for exploring, not what you want the night before an exam.
Start a project properly
Do not work in loose scripts scattered across your Desktop. Make one RStudio Project for this course.
If you ran the source(...) line, this is already done: it created sbd_26_27 in your home folder with data/, scripts/ and output/ inside, and a project file. Open it with File > Open Project, pick sbd_26_27/sbd_26_27.Rproj, and skip to why it matters.
To make one by hand instead:
File > New Project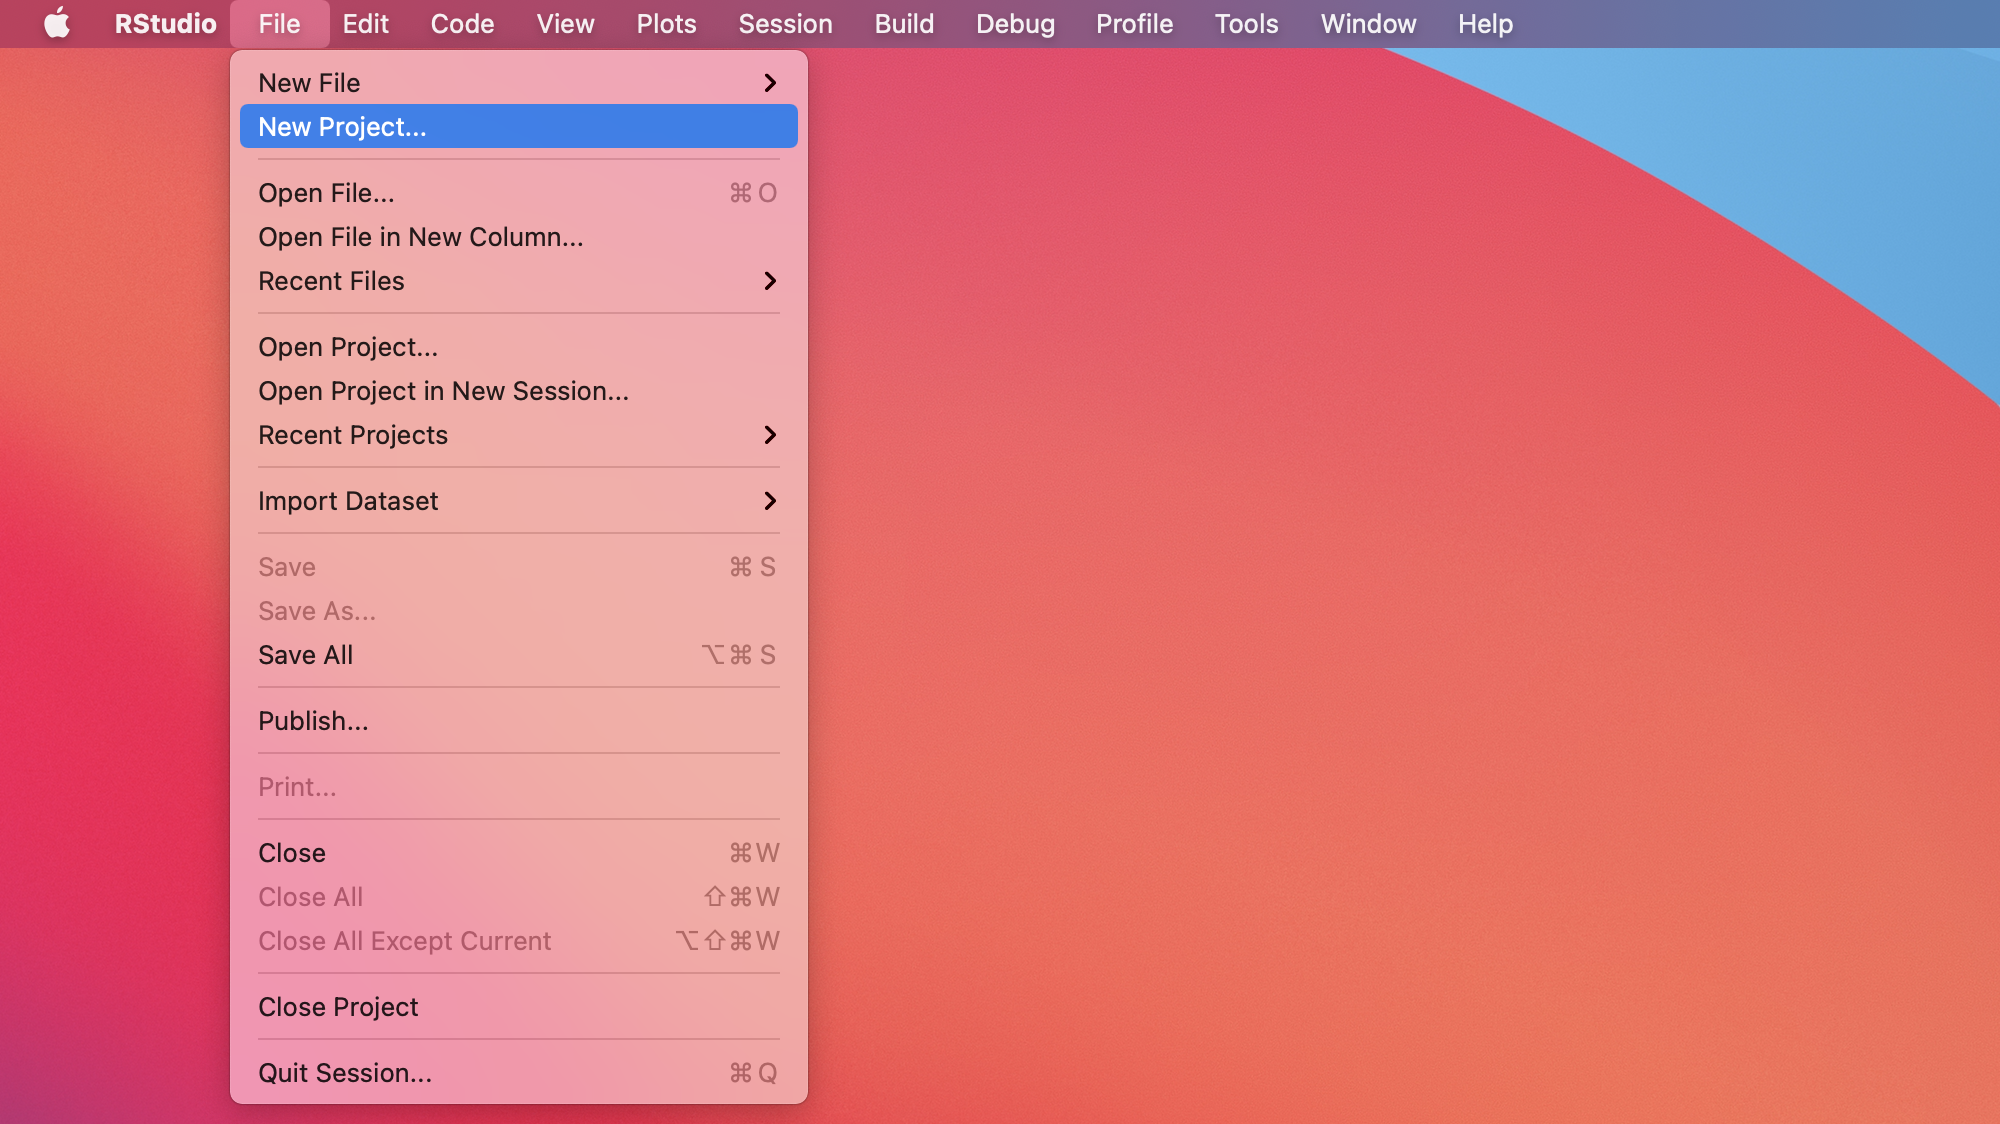
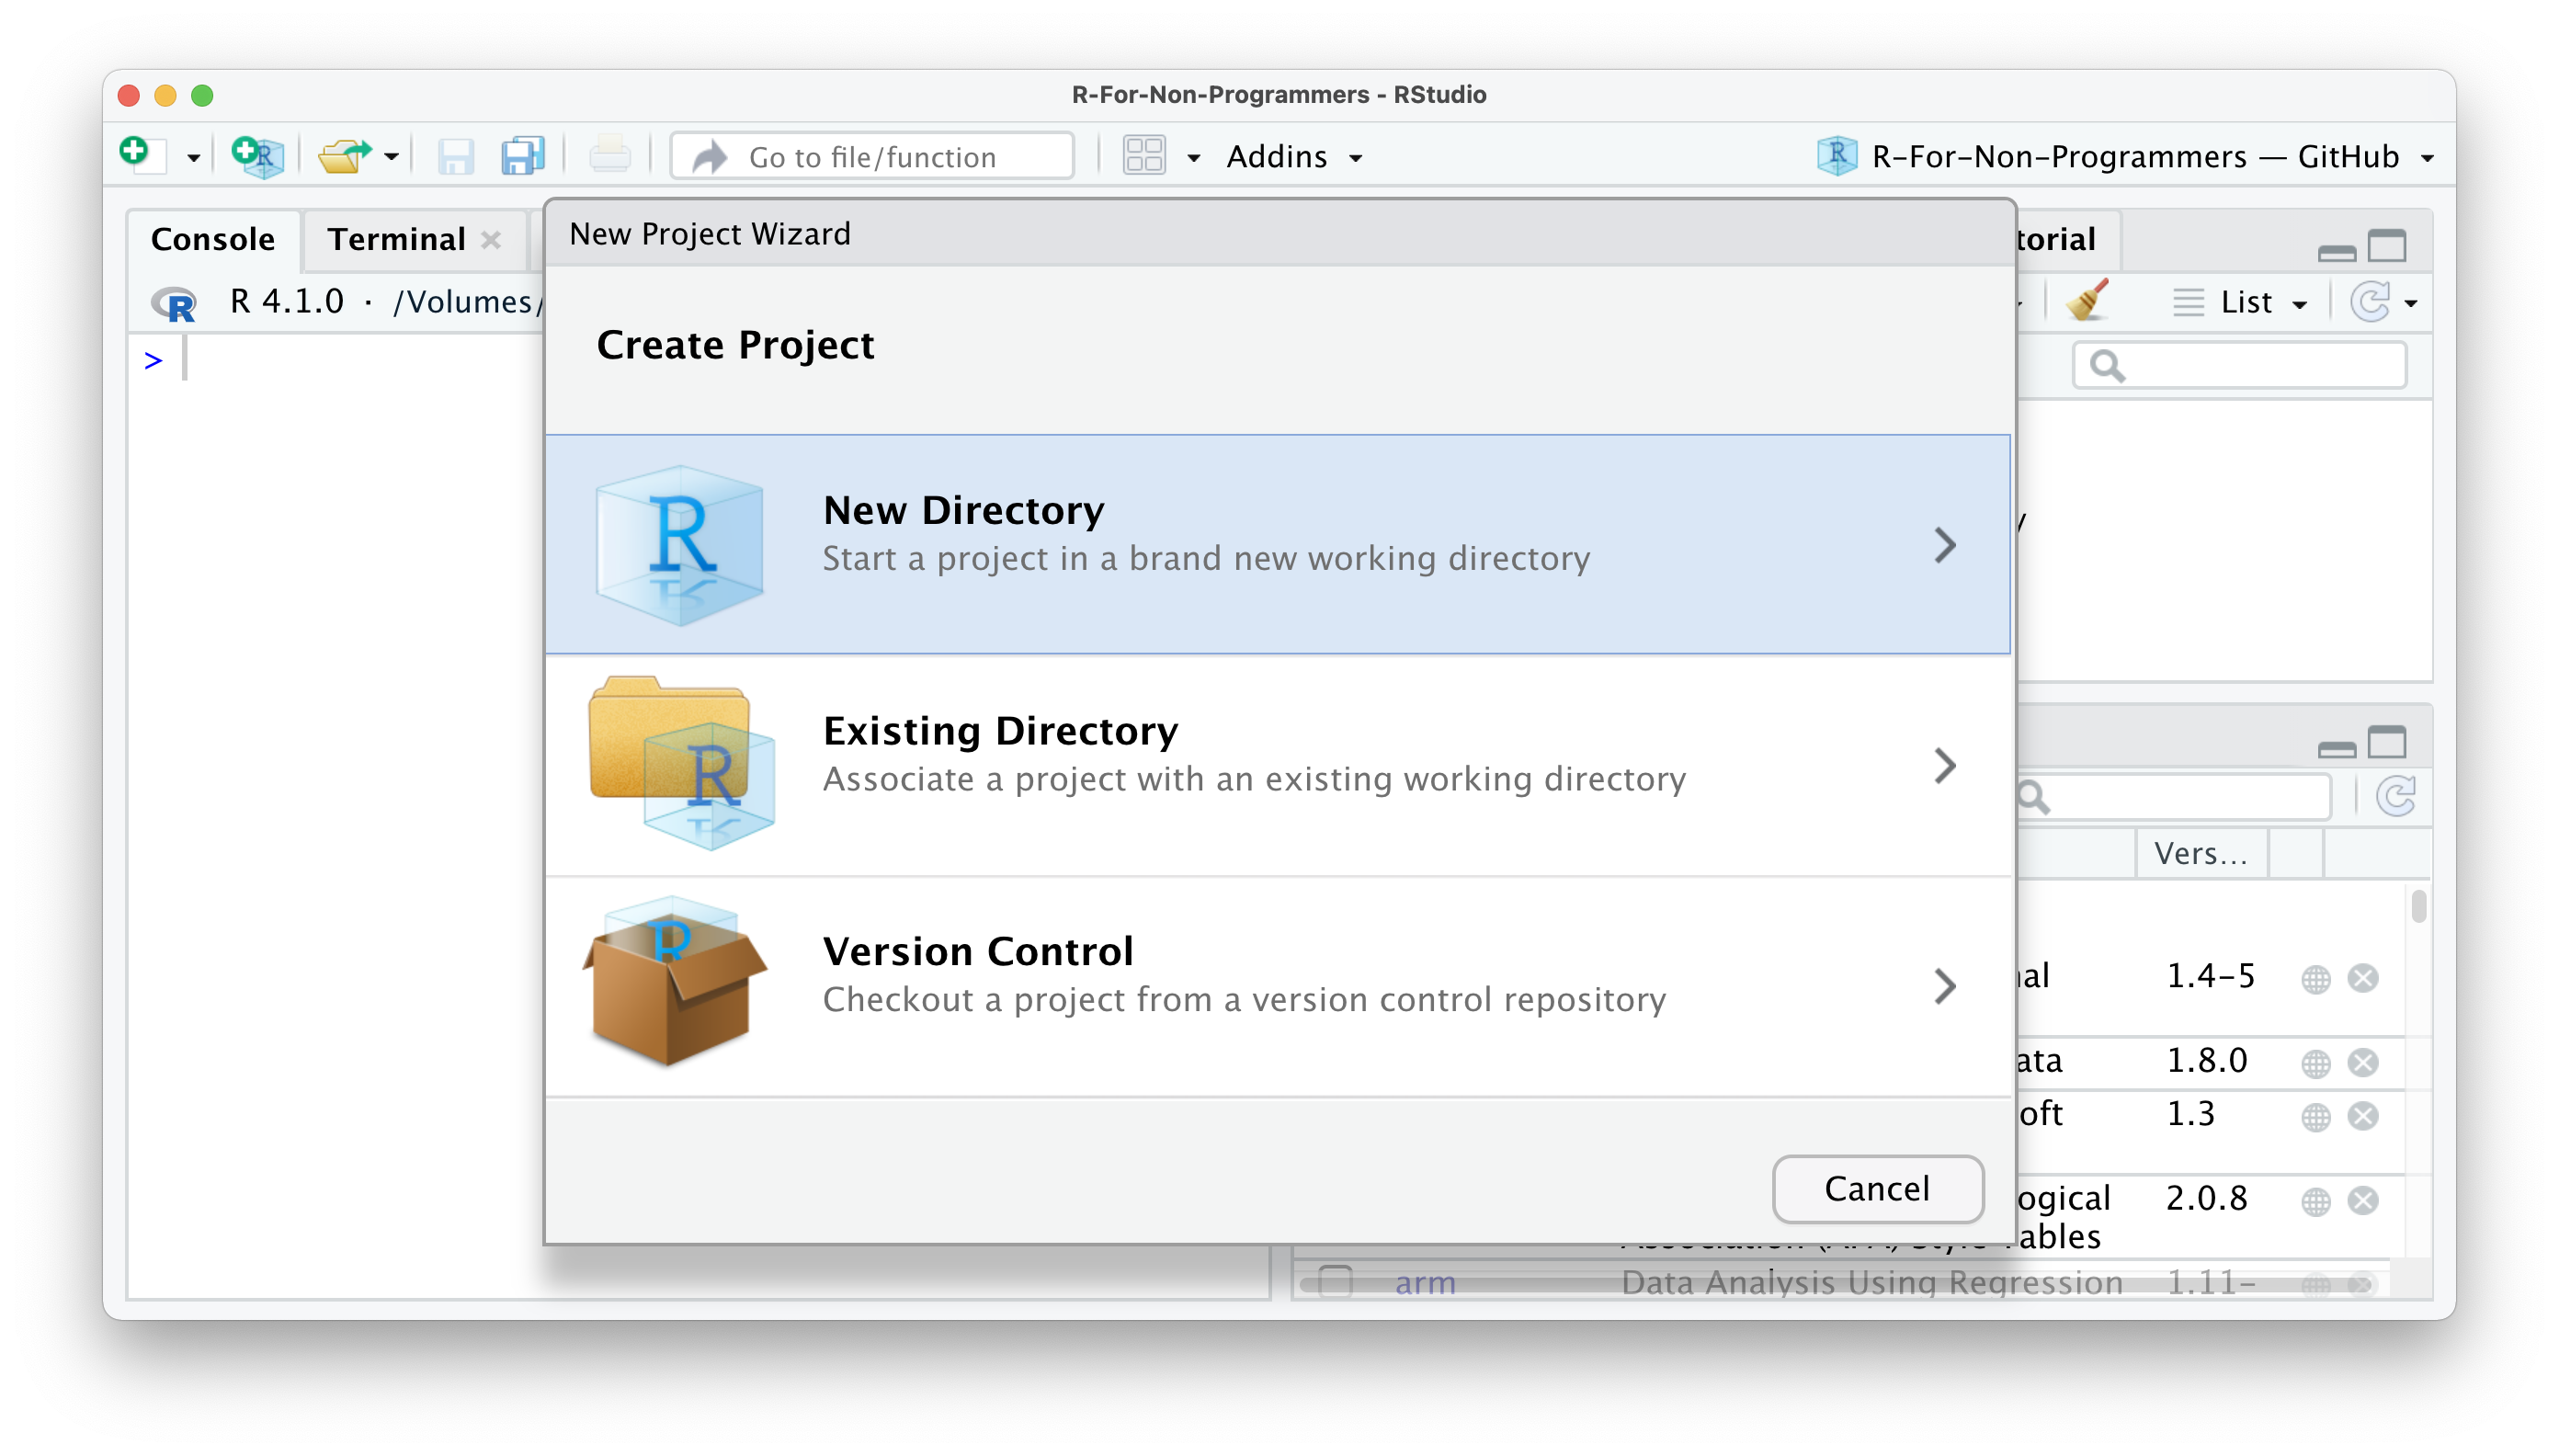
New Directory
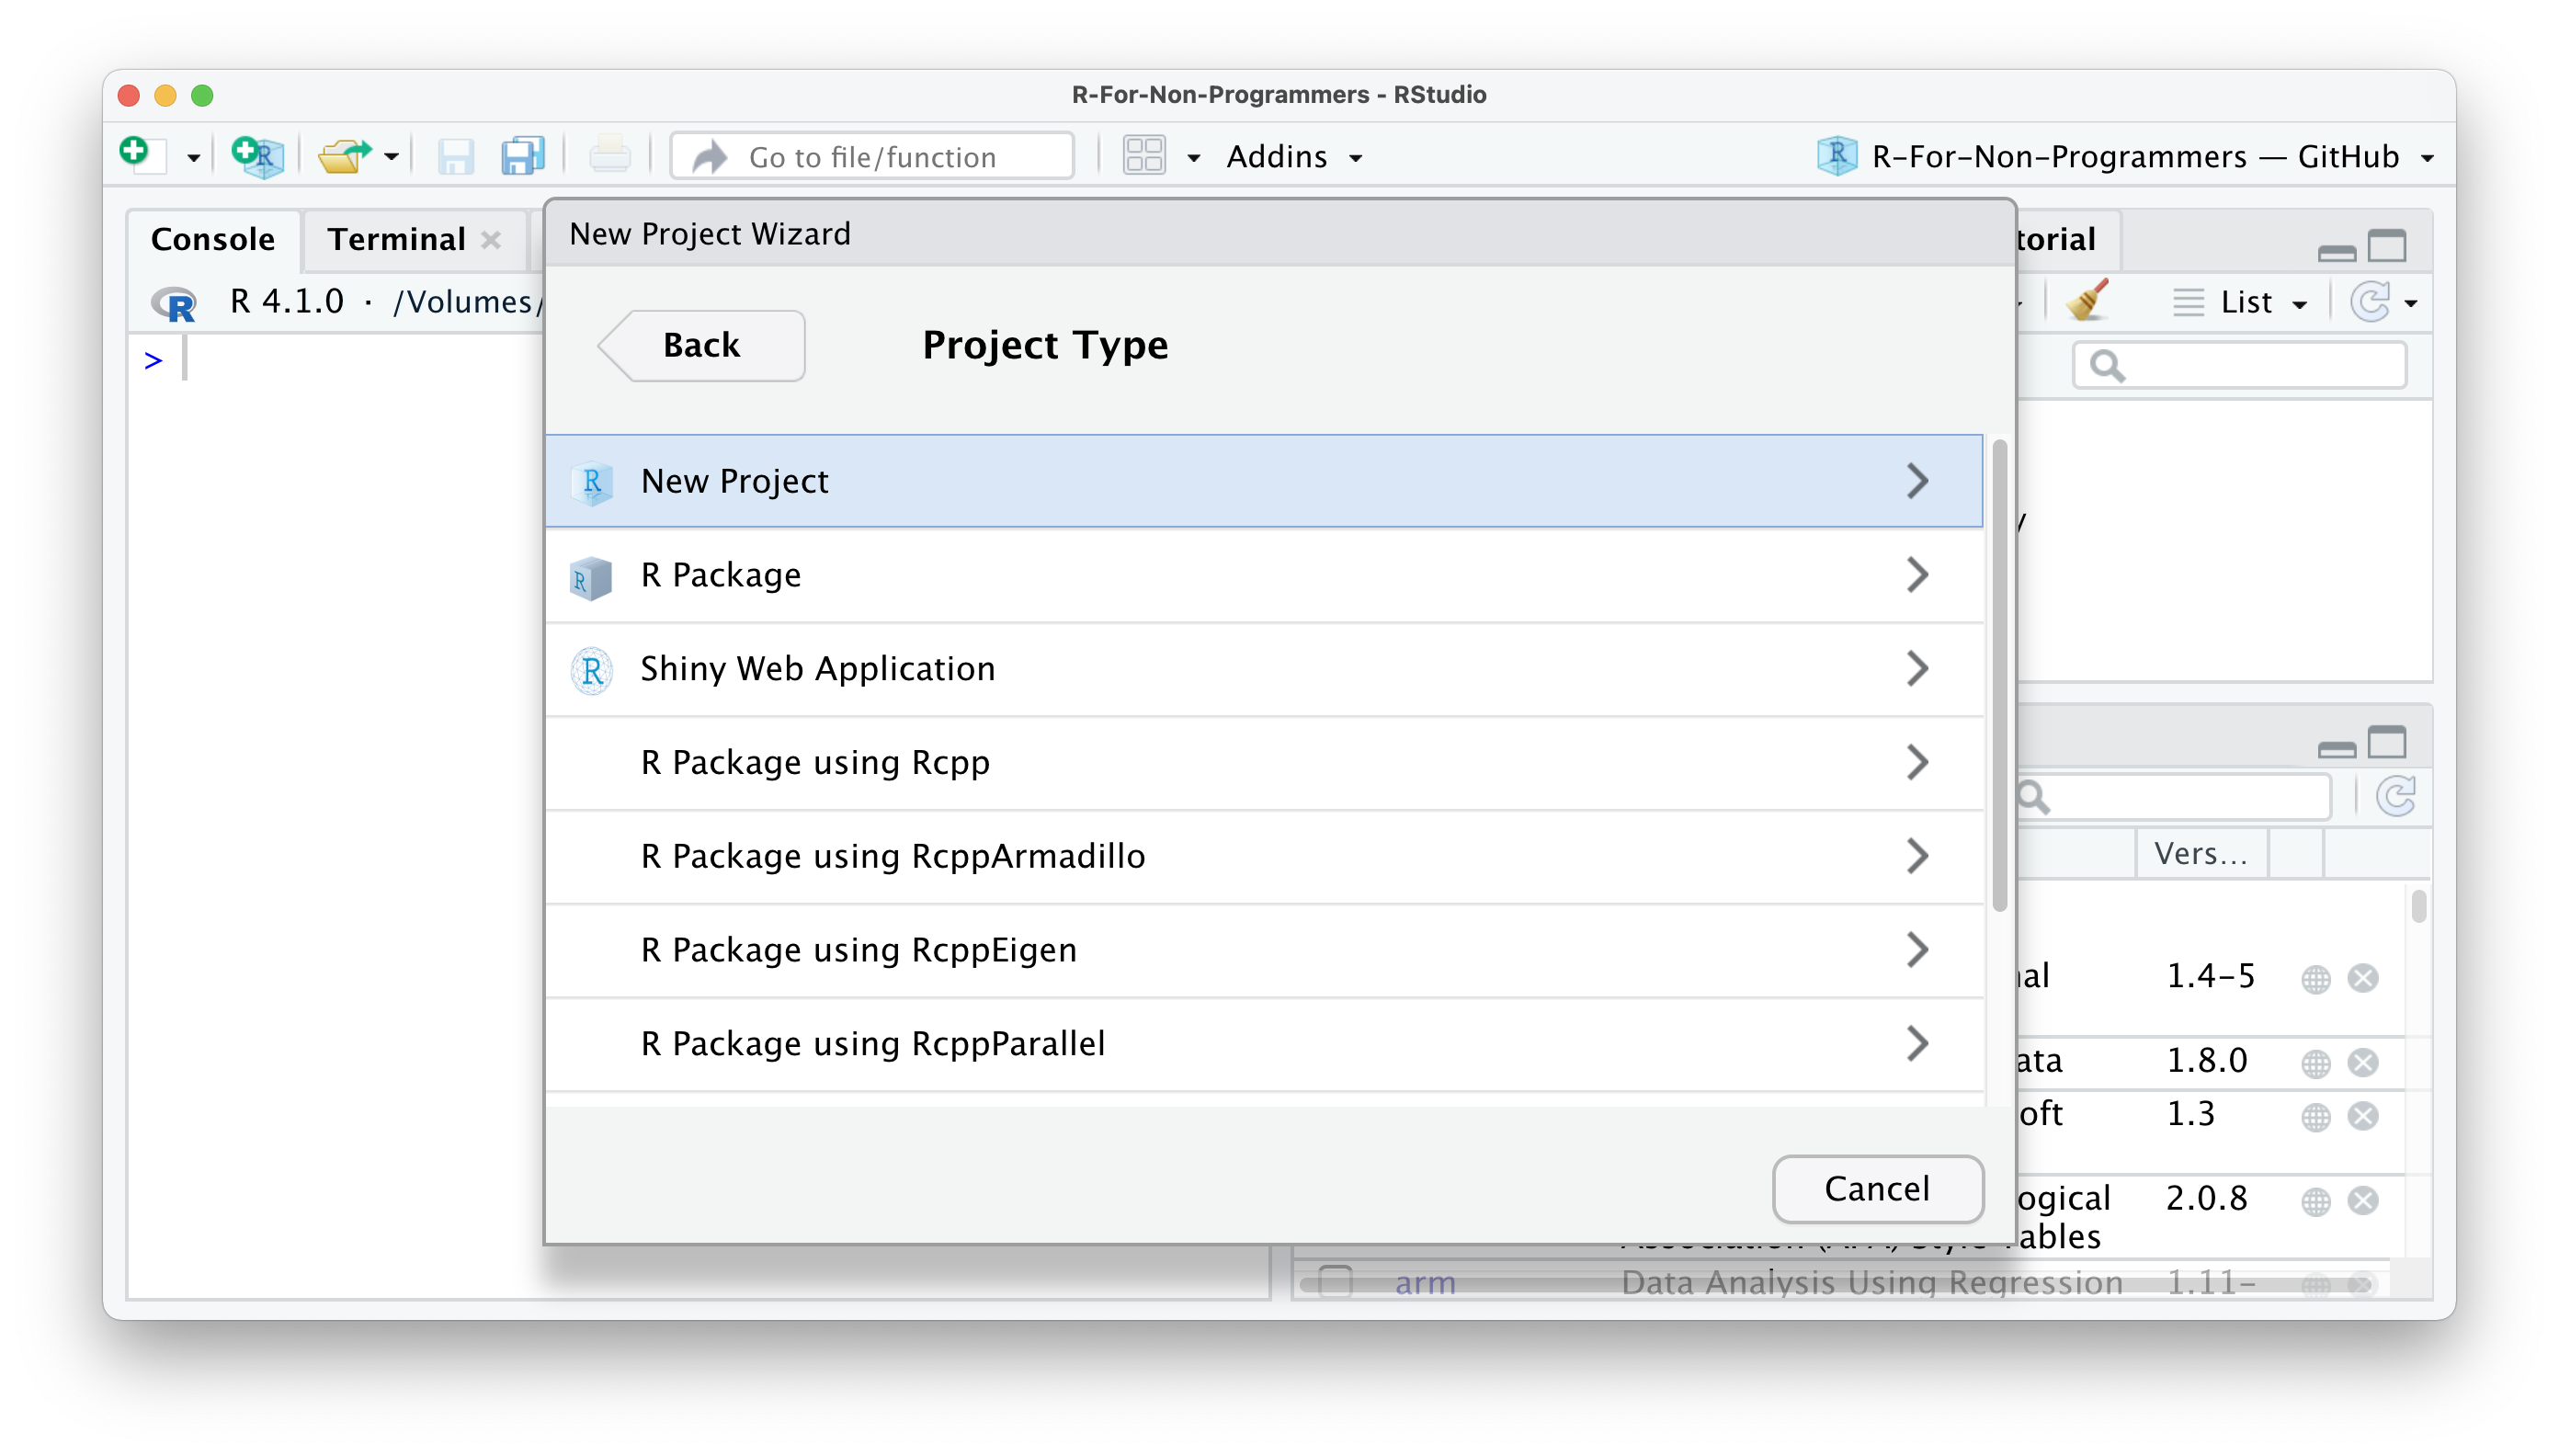
New Project
Name it —
sbd_26_27works — and choose where it lives.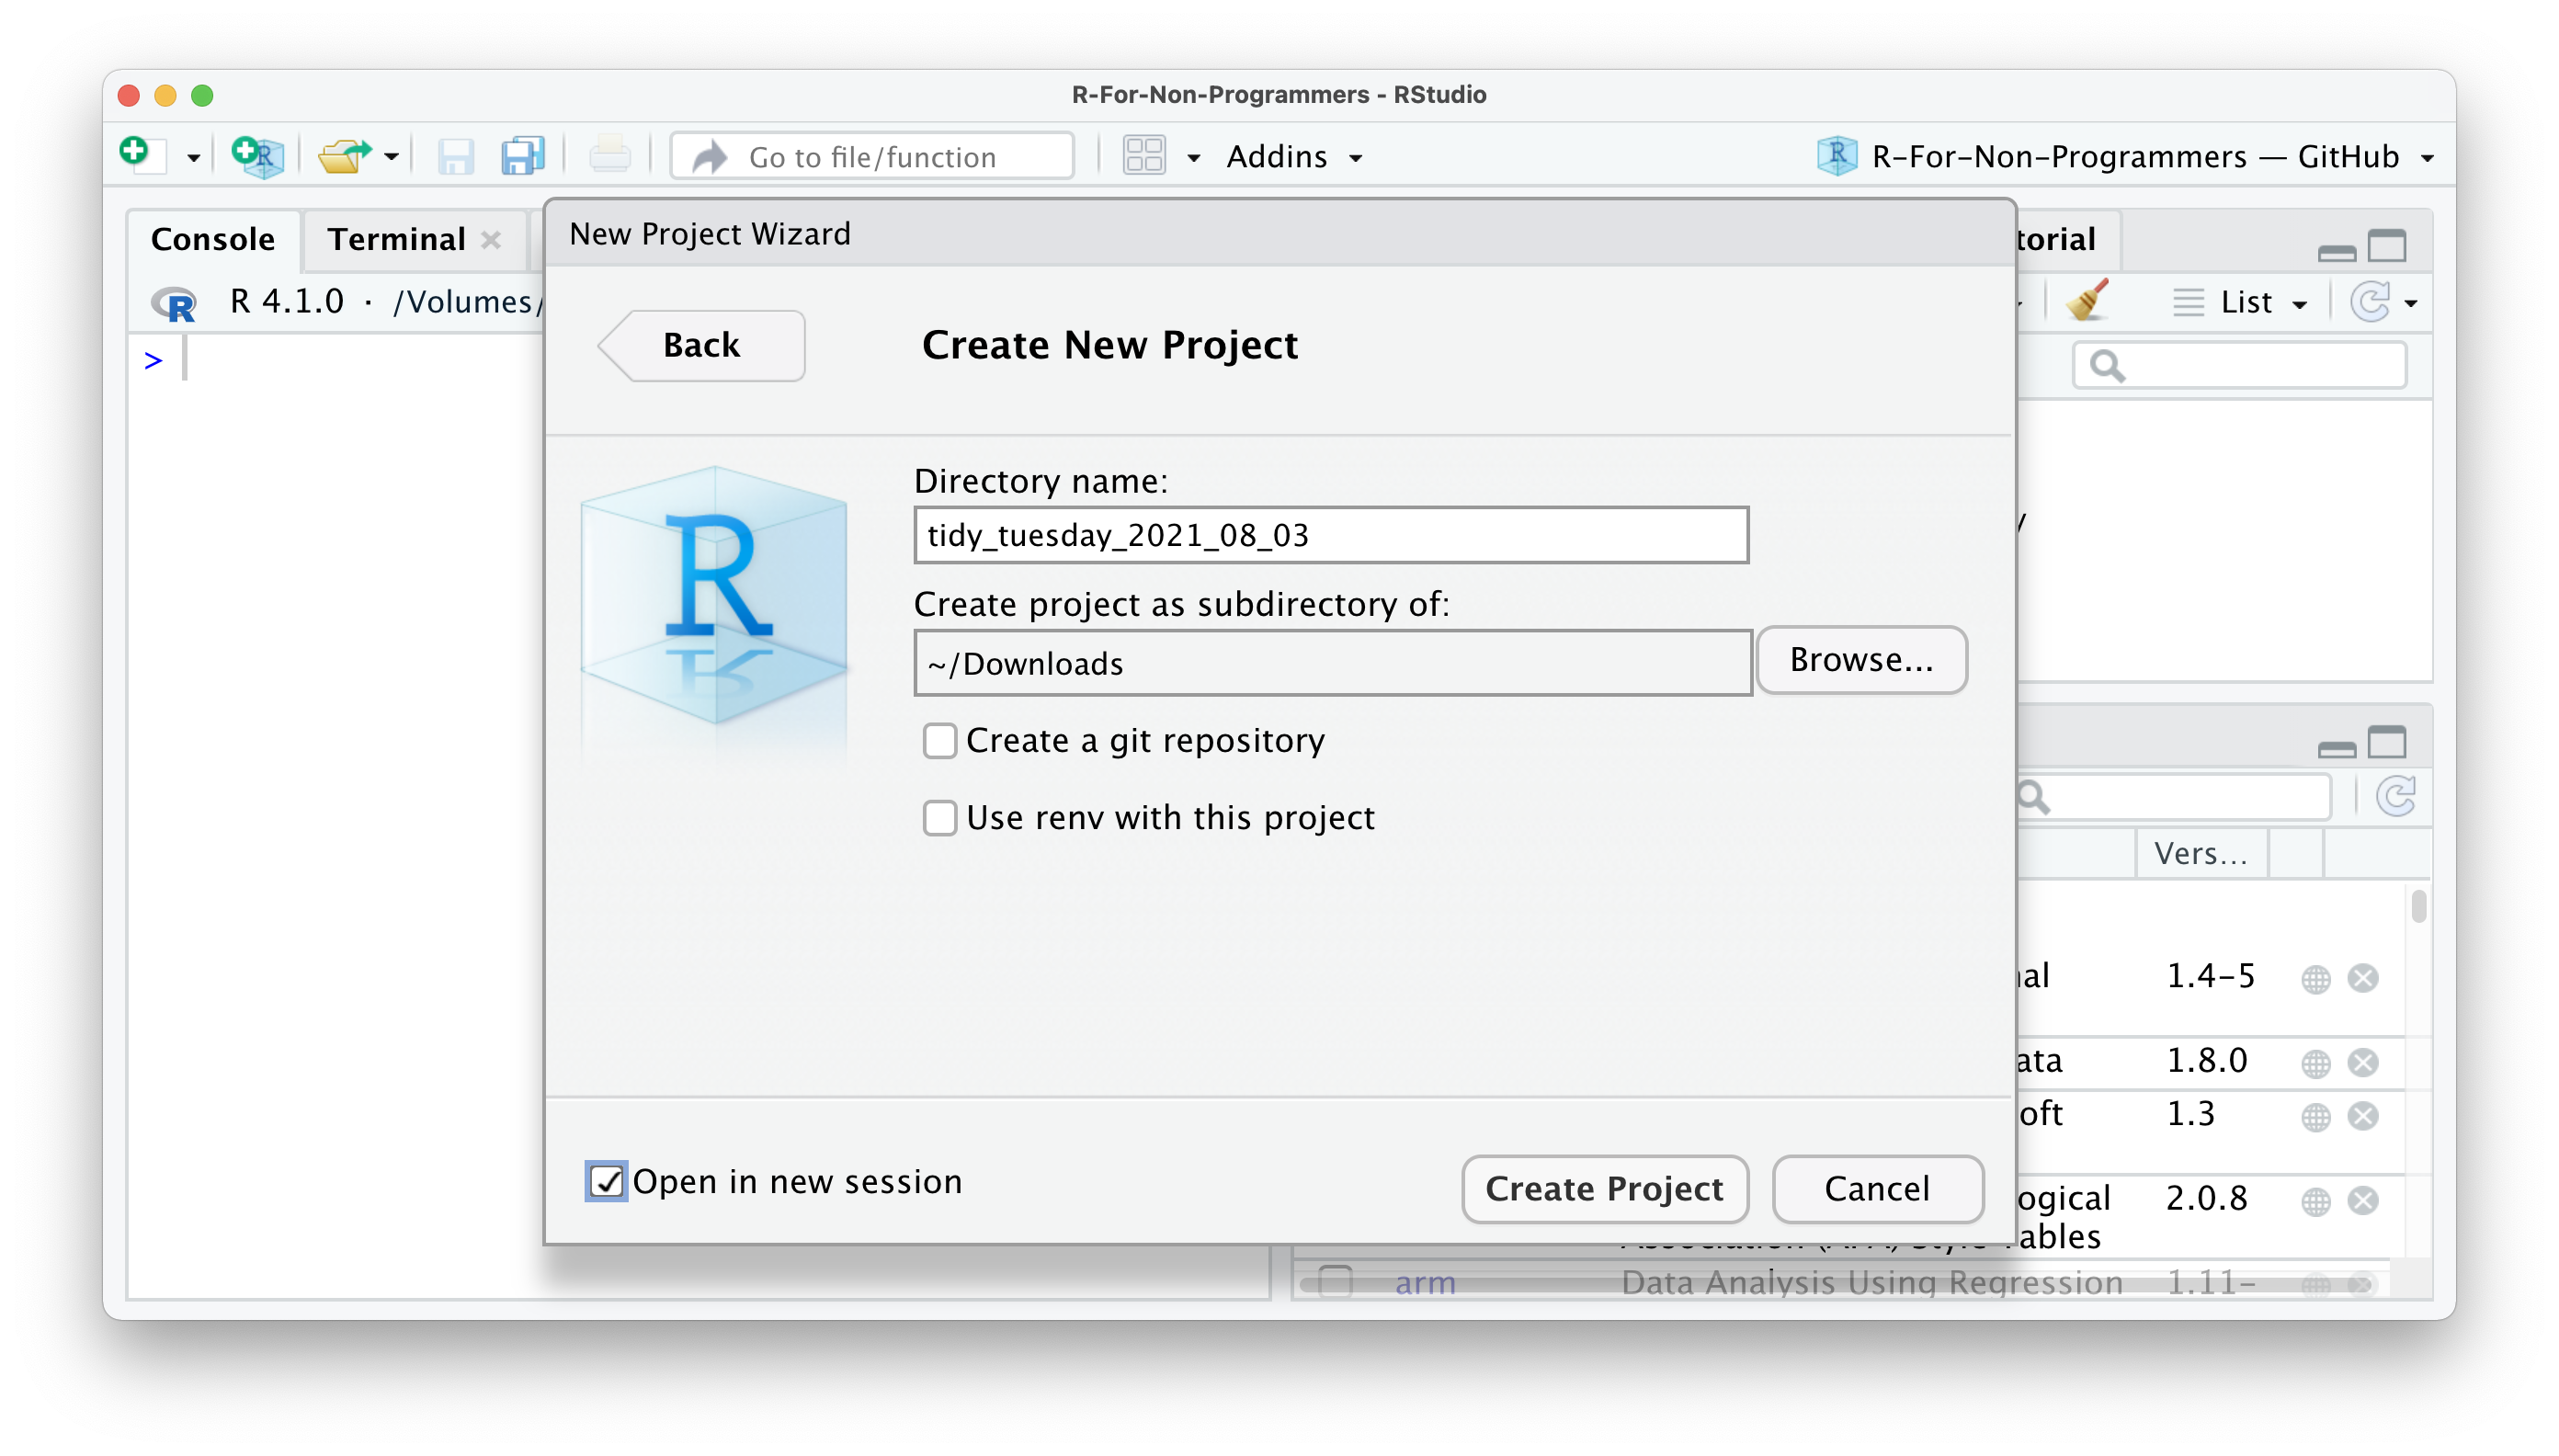
RStudio opens a fresh session with that folder as the working directory.
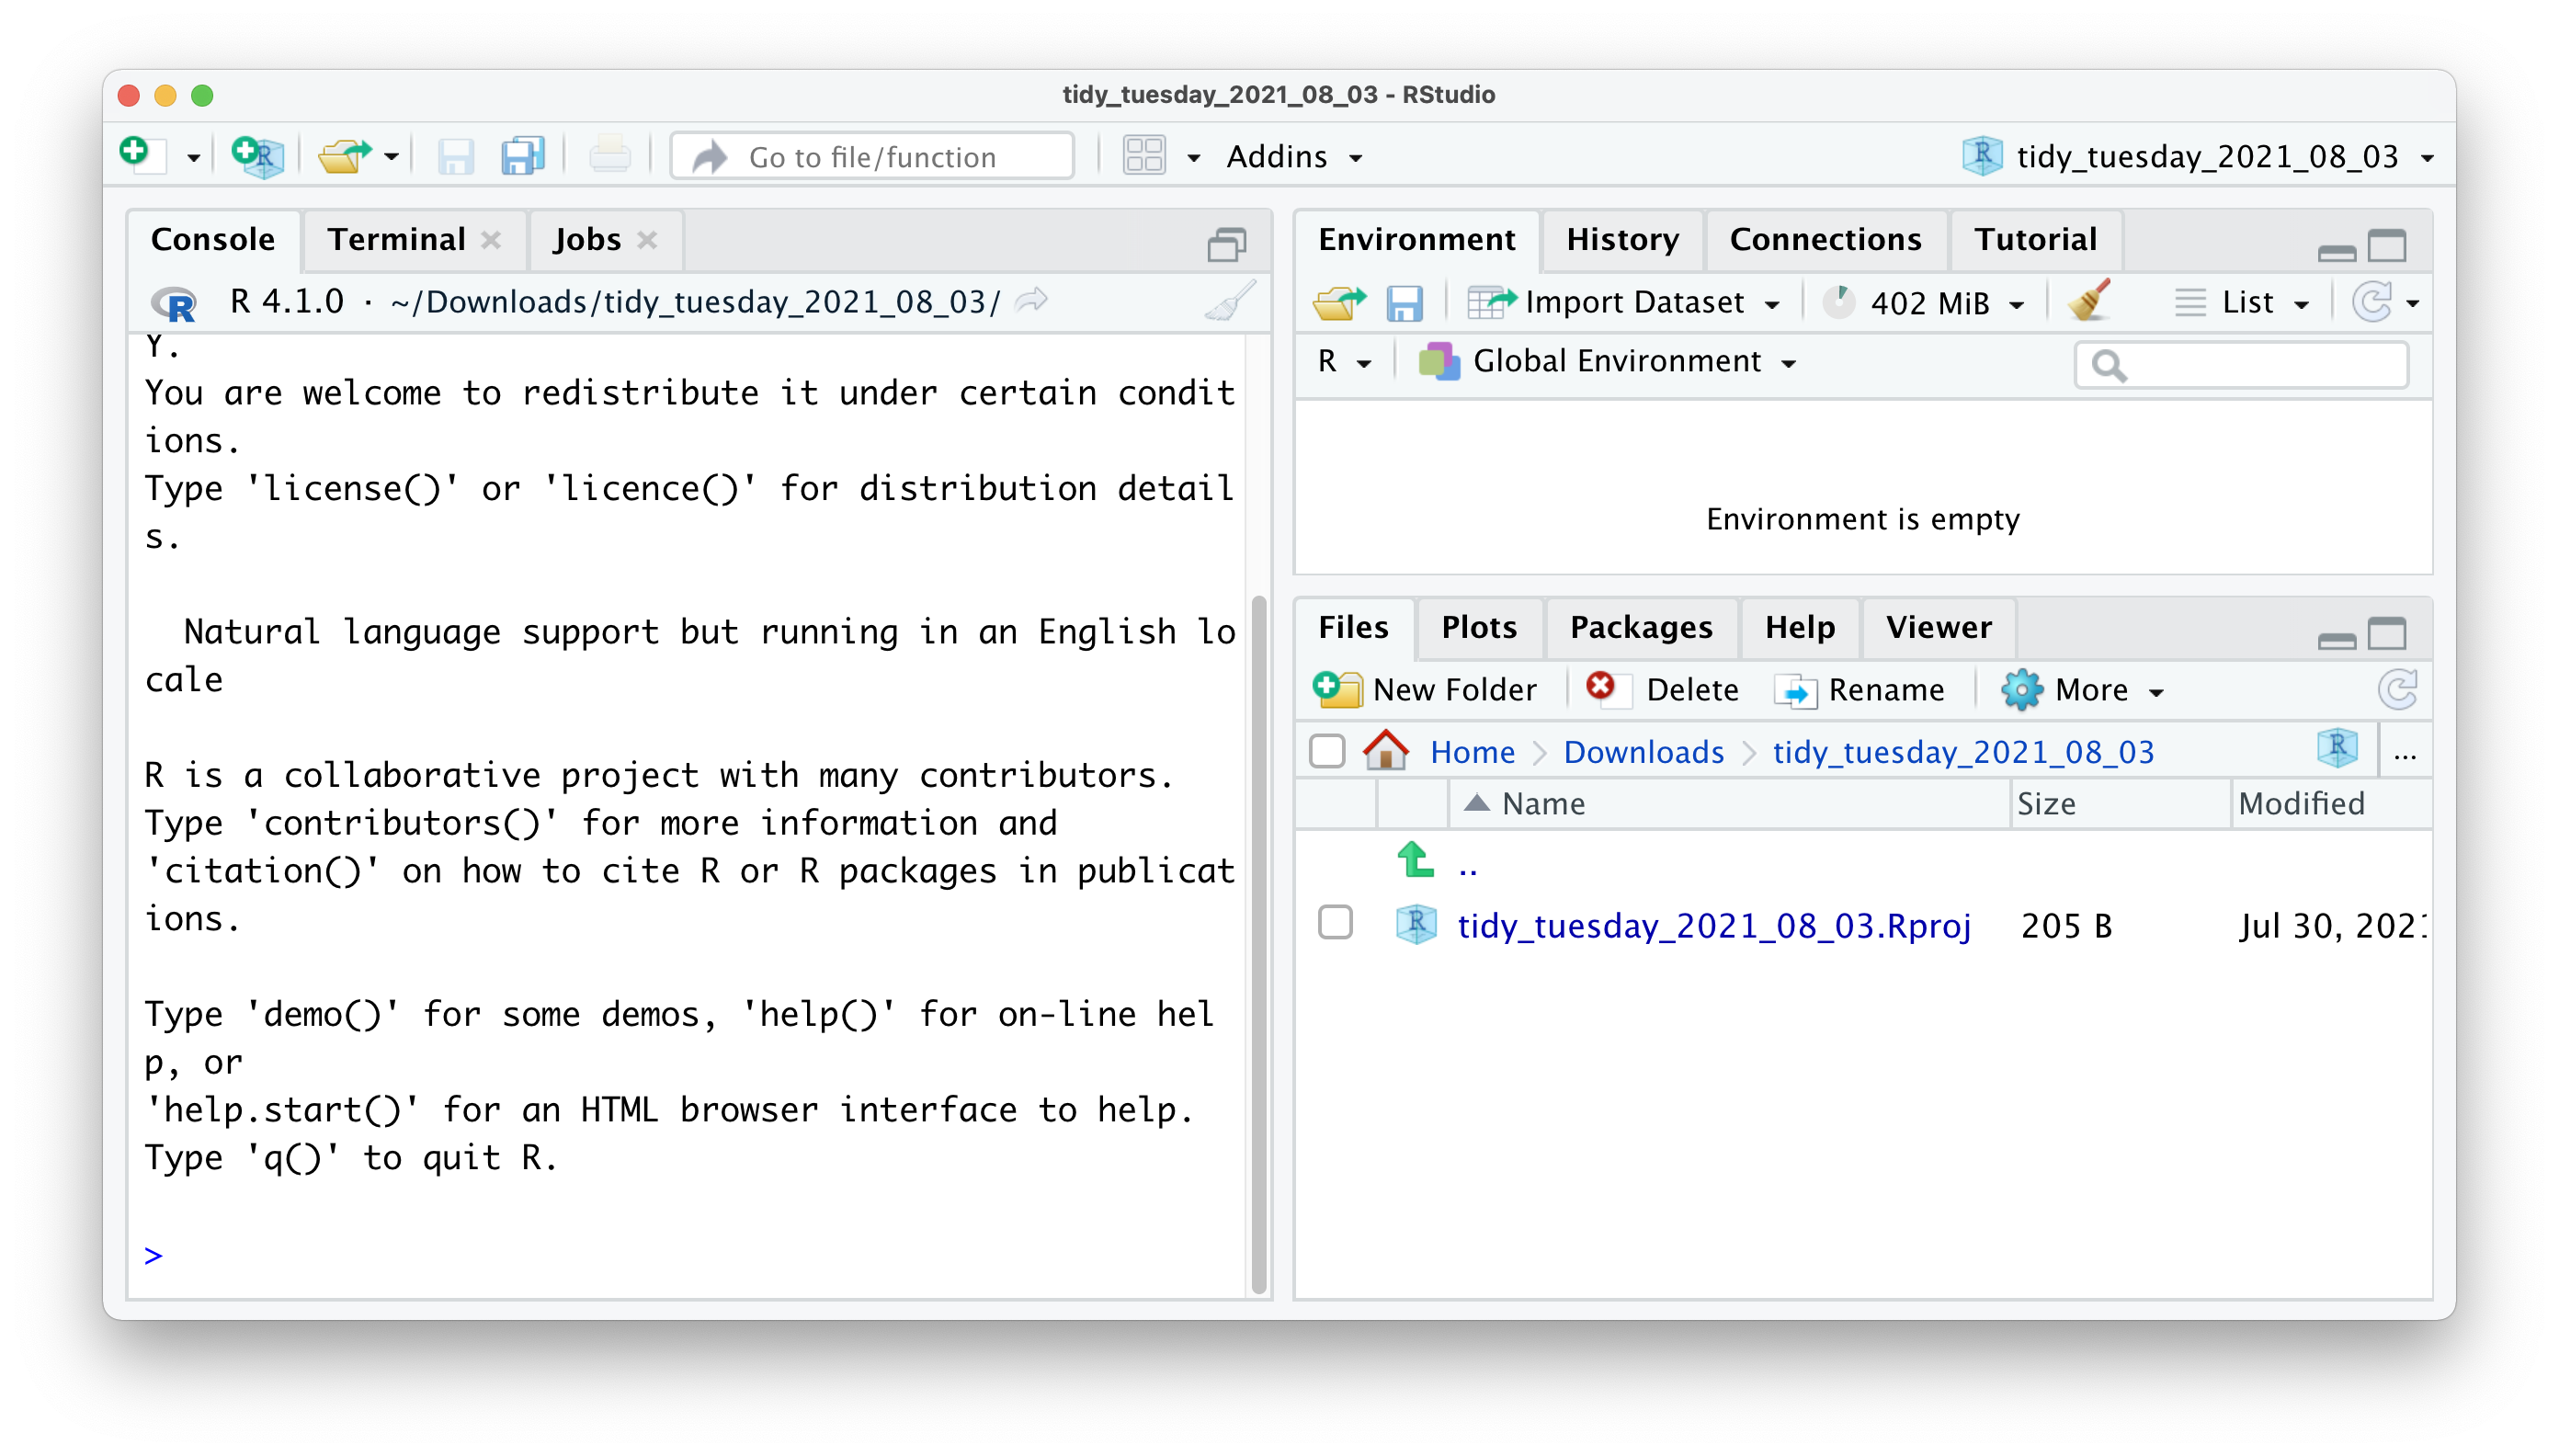
Inside it, make three folders: data/, scripts/, output/.
Why the project matters: file paths
With a Project, you never write a path like /Users/yourname/Desktop/stuff/data.csv again. That path exists on exactly one computer on Earth. Use here() instead:
library(here)
here()                            # the project root, whoever is running it
dat <- read_csv(here("data", "bikeshare.csv"))
here() finds the project root by looking for the .Rproj file, so the same line works on your laptop, on mine, and on the lab machines — which is where the exam happens.
Python
Optional, and the only part of this page that uses a terminal. A few labs show Python alongside R so you can see the same method in both ecosystems. The exam is in R. If the commands below mean nothing to you, skip this section entirely — you lose nothing that is examined.
If you have never installed Python, do not install it from python.org and do not fight your system Python.
uv installs Python and manages the environment, fast, without touching anything else on your machine.
# macOS / Linux
curl -LsSf https://astral.sh/uv/install.sh | sh

# Windows PowerShell
powershell -c "irm https://astral.sh/uv/install.ps1 | iex"
Then, inside your course folder:
uv init sbd-python
cd sbd-python
uv add pandas scikit-learn statsmodels pymc matplotlib seaborn jupyter
uv run jupyter lab
If you prefer a click-through installer, get the Anaconda Distribution. It ships Python, the scientific stack and Jupyter in one go — several gigabytes, but nothing to configure.
Once installed, open Anaconda Navigator and launch JupyterLab.
The packages we use:
| Package | What for |
|---|---|
pandas |
data frames |
scikit-learn |
trees, forests, boosting, clustering, PCA |
statsmodels |
regression and time series, closer to the R output you will recognise |
pymc |
Bayesian models |
matplotlib, seaborn |
plots |
You are not expected to be fluent in both languages. The exam’s coding part is in R. Python appears so you can see that the same method looks different in two ecosystems — useful the day a colleague hands you a scikit-learn pipeline.
When something breaks
there is no package called 'x' — you loaded before installing. Run install.packages("x").
could not find function "f" — the package is installed but not loaded in this session. Run library(...).
Install fails with compilation errors — you need the build tools: xcode-select --install on macOS, Rtools on Windows.
cannot open file 'data.csv' — a working directory problem. Open the Project, then use here().
A package refuses to install: “is not available for this version of R” — your R is too old. Check R.version.string; if it starts with anything below 4.6, reinstall R from CRAN — the installer replaces the old one. This bites people who installed R for a bachelor course three years ago and never touched it again.
It worked yesterday — check R.version.string and whether you updated something. Restart R with ⌘⇧F10 / Ctrl+Shift+F10 and run the script top to bottom in a clean session.
Still stuck? Bring the failing script and the exact error text to office hours — a file beats a screenshot, and a screenshot beats a description.